Tnifi.com - Taking screenshots is an essential skill for anyone using a computer, whether you're capturing an error message, creating a tutorial, or saving something important from the web. On Windows, there are several methods to take screenshots, ranging from keyboard shortcuts to built-in tools, each serving different needs. This comprehensive guide will cover all the ways you can take a screenshot on Windows and provide step-by-step instructions for each method.
Using the Print Screen Key (PrtScn)
The Print Screen key, commonly labeled as PrtScn, is one of the easiest ways to capture a screenshot on Windows. Here's how to use it:
Capture the Entire Screen
To take a screenshot of your entire screen:
- Press the PrtScn key on your keyboard. On some laptops, you may need to press the Fn key along with PrtScn.
- The screenshot is now copied to your clipboard. You can paste it into an image editing tool like Paint or directly into a document by pressing Ctrl + V.
Capture the Active Window
If you only want to capture the window currently in focus:
- Press Alt + PrtScn. This will capture the active window and copy it to the clipboard.
- Paste the screenshot into an image editor or document by pressing Ctrl + V.
Save the Screenshot Directly as a File
Windows 10 and Windows 11 offer a shortcut to save the screenshot directly to your Pictures folder:
- Press Windows + PrtScn. Your screen will dim momentarily, indicating that the screenshot has been captured.
- The image will be automatically saved in the Screenshots folder inside your Pictures directory.
Using the Snipping Tool
The Snipping Tool has been a staple in Windows since Windows Vista. It's a versatile tool that allows you to take more controlled screenshots.
Opening the Snipping Tool
To open the Snipping Tool:
- Click on the Start menu and type "Snipping Tool" into the search bar.
- Select the Snipping Tool from the results.
Taking a Screenshot with the Snipping Tool
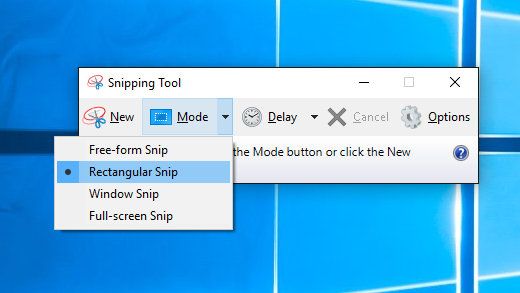
- Once the tool is open, click on New.
- Choose the type of snip you want: Free-form, Rectangular, Window, or Full-screen.
- Select the area of your screen you wish to capture. The snip will automatically open in the Snipping Tool window.
- From here, you can annotate, save, or copy the screenshot.
Using the Snip & Sketch Tool
With the introduction of Windows 10 and Windows 1, Microsoft introduced a more advanced tool called Snip & Sketch.
Opening Snip & Sketch
- Press Windows + Shift + S. The screen will dim, and a small toolbar will appear at the top of your screen.
- Choose between Rectangular Snip, Freeform Snip, Window Snip, or Fullscreen Snip.
Annotating and Saving Your Snip
- After you take the screenshot, a notification will pop up. Click on it to open the Snip & Sketch editor.
- Here, you can annotate your screenshot with a pen, highlighter, or cropping tool.
- Once you're done, click Save to store the image on your computer.
Using the Game Bar (Windows 10 and Windows 11)
The Game Bar is primarily designed for gamers, but it's also a convenient way to take screenshots.
Enabling the Game Bar
- Open the Start menu, then go to Settings > Gaming > Game Bar.
- Ensure that Record game clips, screenshots, and broadcast using Game Bar is turned on.
Taking a Screenshot with Game Bar
- Press Windows + G to open the Game Bar.
- Click on the Capture icon (camera) in the Game Bar overlay.
- Your screenshot will be saved automatically in the Captures folder inside the Videos directory.
Using Third-Party Screenshot Tools
While Windows offers a variety of built-in screenshot tools, there are also third-party options that provide additional features.
Greenshot
Greenshot is a free, open-source screenshot tool that offers a range of options for capturing and editing screenshots.
- Download and install Greenshot from the official website.
- Once installed, press PrtScn to capture the entire screen, or choose from various capture options in the Greenshot menu.
- After capturing, Greenshot opens the screenshot in an editor where you can annotate, highlight, and save the image.
Snagit
Snagit is a premium screenshot tool that offers advanced features like scrolling capture, video recording, and extensive editing options.
- Download and install Snagit from the official website.
- Open Snagit and click on the Capture button.
- Select the area you want to capture, and the screenshot will open in Snagit's editor.
- Use Snagit's tools to annotate, edit, and share your screenshot.
Saving and Sharing Your Screenshots
Once you've captured your screenshot, you'll need to save or share it. Here are some options:
Saving Your Screenshot
- If you used the Print Screen key, paste your screenshot into an image editor like Paint and click File > Save As. Choose a location and format (like PNG or JPEG) to save the file.
2. If you used a tool like Snip & Sketch or Snipping Tool, you can save directly from the tool.
Sharing Your Screenshot
- You can copy your screenshot to the clipboard and paste it into an email, chat, or document.
- Alternatively, save the screenshot to a cloud service like OneDrive or Google Drive for easy sharing via a link.
Conclusion
Taking a screenshot on Windows is a straightforward process, whether you use keyboard shortcuts or more advanced tools like Snip & Sketch. By mastering these methods, you can efficiently capture and share what’s on your screen, whether for work, play, or anything in between. The wide range of options available ensures that you'll always have the right tool for the task, making screenshotting on Windows an easy and efficient process.
If you’re using a Mac and need guidance on capturing screenshots, you can refer to our guide on How to Take Screenshots on Mac, Short and Clear for more information.


.png)
0 Comments